Yes, a regular drill can be used for concrete, but with limitations and the right technique. For best results and safety, a hammer drill or rotary hammer is recommended for concrete drilling, but a standard drill can manage smaller holes or softer concrete if equipped with a masonry bit and used correctly.
Must-Have Tools in Your House If You Work Regularly


Can a Regular Drill Be Used for Concrete? Your Beginner’s Guide
Ever found yourself needing to hang a shelf, mount a bracket, or tackle a small DIY project that involves drilling into a concrete wall or floor? You might be staring at your trusty regular drill and wondering, “Can this tool actually handle concrete?” It’s a common question, and the answer isn’t a simple yes or no. While your everyday drill can make holes in concrete, it’s important to understand its limitations and the best way to approach the task to avoid frustration and potential damage to your tool. We’re here to break down exactly what you need to know to get the job done safely and effectively, even if you’re new to working with concrete.
Understanding Your Regular Drill and Concrete
Before we dive into the how-to, let’s quickly touch on why this question even comes up. Standard household drills, often called “corded” or “cordless drills,” are designed for a variety of tasks like drilling into wood, metal, and plastic. They typically have a rotating chuck that spins a drill bit at a high speed. Concrete, on the other hand, is a very dense and hard material, composed of cement, aggregate (like gravel and sand), and water. Drilling into it requires significant force and a specific type of action to break through the material efficiently.
This is where the distinction between a regular drill and specialized concrete drills comes into play. Specialized tools like hammer drills and rotary hammers add a percussive, hammering action to the rotation. This hammering action chips away at the concrete, making the drilling process much faster and easier. A regular drill, lacking this hammering function, relies solely on the friction and cutting power of the drill bit. This means it will take more effort, more time, and can put a strain on your regular drill if not used properly.
When Can a Regular Drill Handle Concrete?
So, when is it okay to use your standard drill for concrete? Generally, your regular drill is best suited for:
- Small pilot holes: For lighter-duty tasks like hanging small pictures or shelves that don’t require anchors, or for starting a hole before using a more powerful tool.
- Softer concrete: Older concrete, or concrete that hasn’t fully cured, might be slightly less resistant.
- Light-duty anchors: For anchors designed for smaller holes (e.g., 3/16″ or 1/4″ diameter).
- Occasional use: If you only need to drill one or two small holes infrequently.
If your project involves drilling multiple holes, larger diameter holes, or if you’re working with very hard, modern concrete, you’ll likely find a hammer drill or rotary hammer to be a much better investment. These tools are specifically designed for the task and will save you a lot of time and physical exertion.
Essential Tools and Materials You’ll Need
To even attempt drilling into concrete with a regular drill, you absolutely need the right accessories. Using a standard wood or metal drill bit will not work and will likely damage both the bit and the concrete. Here’s what you’ll need:
1. The Right Drill Bit: Masonry Bits
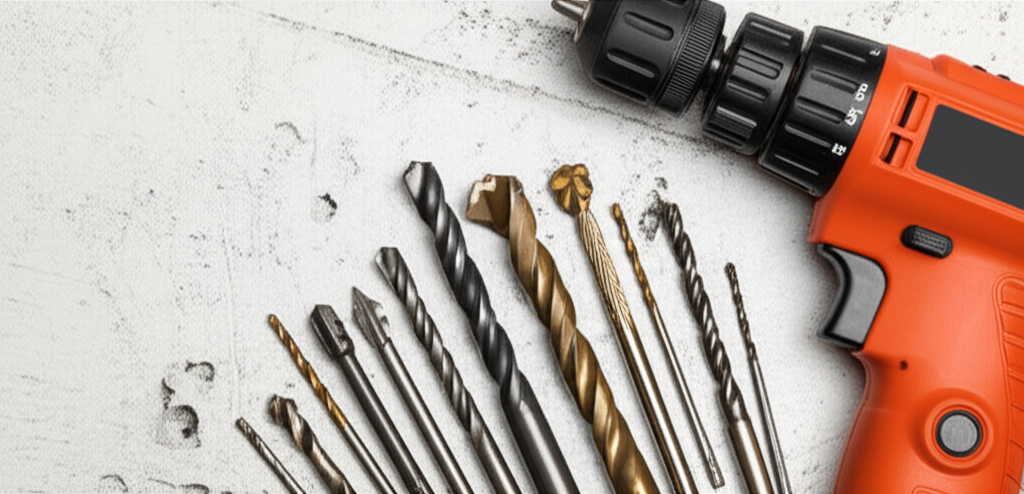
This is non-negotiable. You must use a masonry drill bit. These bits are specifically designed for drilling into hard materials like concrete, brick, and stone. They typically have a carbide tip, which is much harder than standard steel, allowing it to grind away at the concrete.
- Carbide-Tipped Masonry Bits: These are the most common and affordable option for occasional use. They are identifiable by their hardened, often grey or black, pointed tip.
- Sizes: Masonry bits come in various diameters, measured in fractions of an inch (e.g., 1/4″, 3/8″, 1/2″). Ensure you have the correct size for your intended anchor or fastener.
- Shank Type: Most standard drills use bits with round shanks or SDS (Slotted Drive System) shanks. For a regular drill, you’ll likely be using bits with round shanks that fit into a standard three-jaw chuck.
2. Your Regular Drill
As mentioned, a standard corded or cordless drill will work, but a more powerful drill (higher voltage for cordless, higher amperage for corded) will perform better. Look for a drill with variable speed control and a clutch setting.
3. Safety Gear
Drilling into concrete creates dust, which can be harmful if inhaled. Always prioritize safety:
- Safety Glasses: Essential to protect your eyes from flying debris and dust.
- Dust Mask (N95 or better): Crucial for protecting your lungs from silica dust, which is present in concrete.
- Hearing Protection: While not as loud as a rotary hammer, drilling can still be noisy.
- Gloves: For a better grip and to protect your hands.
4. Measuring and Marking Tools
- Tape Measure: To determine the correct placement for your hole.
- Pencil or Marker: To mark the exact drilling spot.
- Level: To ensure your hole is straight, especially if hanging something that needs to be level.
5. Optional but Helpful:
- Vacuum Cleaner: To help clean up dust as you go.
- Water Spray Bottle: A light mist of water can help keep the bit cool and reduce dust, but use sparingly to avoid excessive mess.
- Drill Stop Collar: To control the depth of your hole.
Step-by-Step: How to Drill Concrete with a Regular Drill
Now that you have your tools, let’s get to the actual drilling. Patience and the right technique are key here.
Step 1: Plan and Mark Your Hole
Decide exactly where you need the hole. Use your tape measure and level to mark the precise spot on the concrete. Double-check your measurements before drilling.
Step 2: Select the Correct Masonry Bit
Choose a masonry bit that matches the diameter recommended for the anchor or screw you plan to use. If you’re unsure, it’s often better to start with a slightly smaller bit and enlarge the hole if needed, rather than making it too big.
Step 3: Insert the Masonry Bit into Your Drill
Open the chuck of your regular drill by twisting it. Insert the shank of the masonry bit as far as it will comfortably go. Tighten the chuck securely by hand, then give it a final snug with the chuck key (if your drill uses one) or by hand-turning the chuck body. Make sure the bit is centered and doesn’t wobble.
4. Set Your Drill Settings
This is crucial:
- Speed: Set your drill to a lower speed setting. High speeds generate more heat and friction, which can quickly overheat and damage your drill bit and your drill. A slower, steady speed is more effective for concrete.
- Mode: For a regular drill, you will only be using the standard drilling mode (the one without the hammer icon). If your drill has a hammer function, ensure it is turned OFF for this task. A regular drill does not have the percussive action needed to break concrete effectively, and trying to force it will only overheat the motor.
- Clutch: If your drill has a clutch, set it to a higher torque setting. This helps prevent the drill from kicking back if the bit binds.
Step 5: Start Drilling
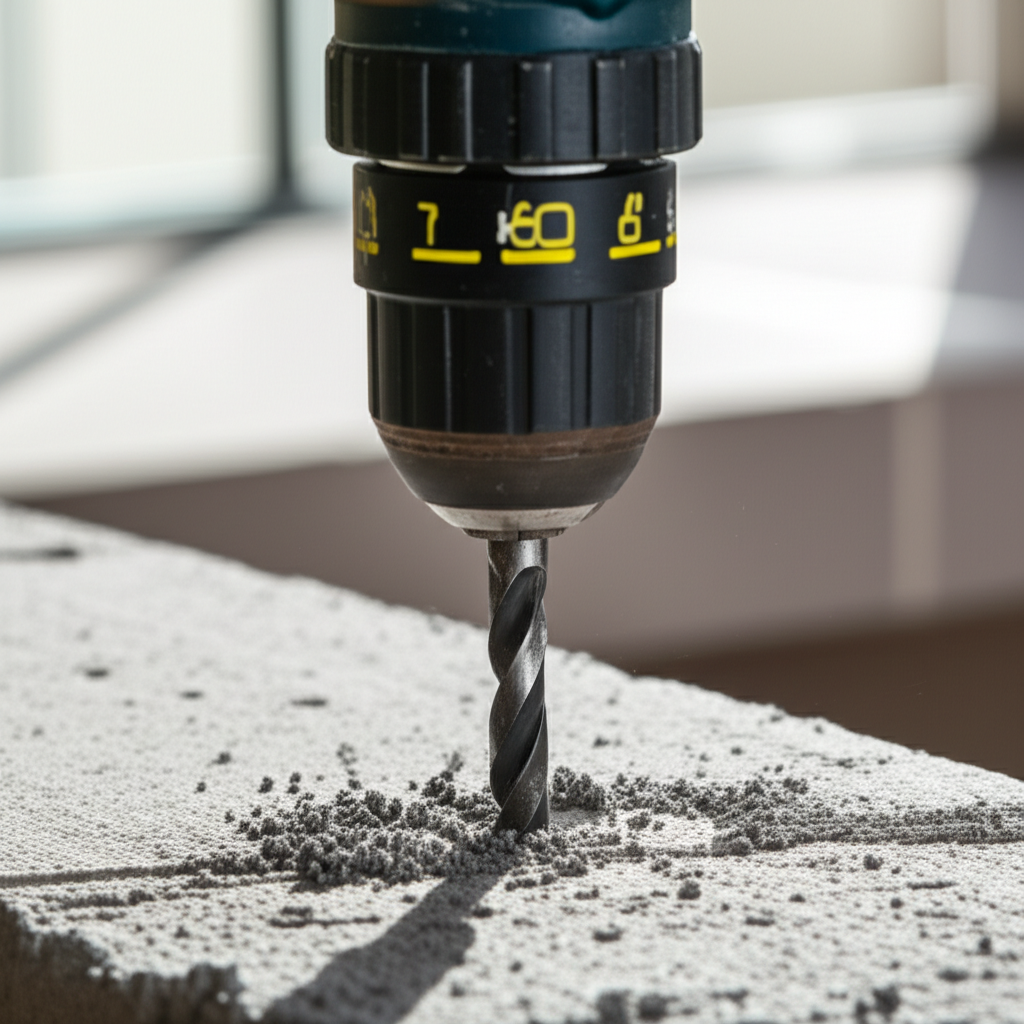
Place the tip of the masonry bit precisely on your marked spot. Hold the drill firmly with both hands, keeping it as straight and perpendicular to the concrete surface as possible. Apply firm, consistent pressure. Don’t force it initially; let the bit start to create a small indentation.
Step 6: Drill with a Steady Motion and Pullover
Once a small divot is formed, begin drilling. Maintain steady pressure and keep the drill straight. Periodically pull the drill bit out of the hole while it’s still spinning. This action helps clear out the dust and debris that accumulates in the hole, which is essential for efficient drilling and to prevent the bit from overheating.
Tip: You can also use a “back-and-forth” or “pecking” motion, drilling for a few seconds, then pulling out to clear dust, and repeating. This is especially helpful with a regular drill.
Step 7: Cool the Bit
Concrete dust and friction generate significant heat. If the bit feels very hot to the touch (be cautious!), or if you notice smoke, stop drilling immediately. Let the bit cool down. You can use a damp cloth to wipe away dust and slightly cool the bit, or even a light mist from a spray bottle onto the bit (not the drill!). Avoid submerging a hot bit in water, as this can cause thermal shock and damage it.
Step 8: Continue Drilling to the Desired Depth
Keep drilling, pausing to clear dust regularly, until you reach the required depth. Use a drill stop collar or wrap tape around your bit to mark the depth if needed.
Step 9: Clean the Hole
Once the hole is drilled, use a vacuum cleaner with a narrow nozzle or a blast of compressed air to thoroughly clean out all the dust from the hole. This is critical for ensuring your anchor or fastener grips properly.
Step 10: Insert Your Anchor or Fastener
Now you can insert your wall plug, anchor, or screw into the clean hole.
When to Upgrade: Hammer Drills vs. Rotary Hammers
If you find yourself frequently drilling into concrete, or if you need to drill larger holes or multiple holes, investing in a dedicated concrete drilling tool is highly recommended. Here’s a quick look at the options:
| Feature | Regular Drill | Hammer Drill | Rotary Hammer |
|---|---|---|---|
| Primary Action | Rotation | Rotation + Percussion (side-to-side hammering) | Rotation + Percussion (forward, piston-driven hammering) |
| Best For | Wood, metal, plastic; very light concrete tasks | Masonry, light concrete drilling, occasional use | Concrete, stone, demolition; frequent and heavy-duty use |
| Speed & Efficiency | Slowest for concrete | Much faster than regular drill | Fastest and most efficient |
| Power/Torque | Variable, often lower for concrete tasks | Generally higher than regular drills | Highest, designed for heavy loads |
| Cost | Lowest | Mid-range | Highest |
A hammer drill is a significant step up from a regular drill for concrete. It adds a hammering action that is more effective for breaking apart concrete. They are ideal for DIYers who tackle concrete projects more than just once in a while. You can learn more about how hammer drills work from resources like CNET’s guide to choosing a power drill, which often touches upon hammer drill capabilities.
A rotary hammer is in a league of its own. It uses a pneumatic piston system to deliver powerful, forward blows, making it incredibly efficient for drilling large holes, chipping concrete, and even light demolition. For serious concrete work, a rotary hammer is the tool of choice. The U.S. Department of Labor’s Occupational Safety and Health Administration (OSHA) provides important guidelines on general safety requirements for concrete and masonry work, which underscores the importance of using the right tools for the job.
Tips for Success and Avoiding Problems
Drilling concrete with a regular drill can be challenging, but a few extra tips can make a big difference:
- Start Slow and Steady: Don’t be tempted to crank up the speed. Patience is your best friend here.
- Maintain Pressure: Consistent pressure is more effective than bursts of aggressive force.
- Keep it Cool: Overheating is the quickest way to ruin your bit or drill. Take breaks.
- Clear the Dust: This cannot be stressed enough. A clogged hole means no progress and more heat.
- Drill Straight: Angled drilling puts extra stress on the bit and can cause it to break or bind.
- Listen to Your Drill: If your drill is struggling, making grinding noises, or overheating excessively, stop. You might be pushing it too hard, or the concrete might be too tough for it.
Frequently Asked Questions (FAQ)
Q1: Can I use my cordless drill for concrete?
A1: Yes, you can use a cordless drill for concrete, but it’s best to use one with a higher voltage (18V or 20V) as it will have more power. Always use a masonry bit and drill at a slower speed with consistent pressure. For tougher jobs, a cordless hammer drill or rotary hammer is a better choice.
Q2: What happens if I use a regular drill bit on concrete?
A2: Using a standard wood or metal drill bit on concrete will be extremely ineffective. The bit will dull very quickly, potentially overheat and melt, and you’ll likely make very little progress. It can also damage your drill by causing it to overheat or bind.
Q3: How deep can I drill into concrete with a regular drill?
A3: The depth depends on the power of your drill, the size of the hole, and the hardness of the concrete. For small holes (e.g., 1/4″ or 3/16″), you might be able to drill a few inches deep. However, for deeper or larger holes, a regular drill will struggle, overheat, and may not be able to complete the task.
Q4: Is it safe to use my regular drill without a hammer function on concrete?
A4: Yes, it is safe, but it will be much slower and more labor-intensive. The key is to use the correct masonry bit, a slower speed, and to periodically clear out the dust. Ensure your drill is in the standard drilling mode (no hammer icon). If your drill has a hammer function, you would turn it OFF for this task when using a regular drill.
Q5: How long will a masonry bit last when drilling concrete with a regular drill?
A5: The lifespan of a masonry bit depends on the quality of the bit, the hardness of the concrete, and how you use it. With a regular drill, you’re asking more of the bit due to the lack of percussive action. You might get a few holes out of a bit before it starts to show significant wear, especially if you overheat it or don’t clear dust properly. For more frequent use, consider investing in higher-quality bits or a dedicated concrete drilling tool.
Q6: Can I use water to cool the bit while drilling concrete?
A6: A light mist of water can help cool the bit and reduce dust, but use it sparingly. Too much water can create a slurry that makes it harder to drill and can be messy. Avoid pouring water directly onto a hot bit, as the sudden temperature change can damage it. Always disconnect power before cleaning or adjusting the bit.
Conclusion: Your Drill Can Do It, With the Right Approach
So, to circle back to our initial question: can a regular drill be used for concrete? The answer is a qualified yes. While it’s not the ideal tool for extensive concrete work, with the correct masonry bits, a patient approach, and proper technique, your everyday drill can indeed help you drill into concrete for those smaller, less demanding tasks. Remember to prioritize safety, keep your bit cool, and clear out that dust regularly. If your DIY aspirations involve more significant concrete projects, consider upgrading to a hammer drill or rotary hammer to make your life easier and your work more efficient. Happy drilling!