Yes, you absolutely can drill through glass safely and effectively with the right tools, techniques, and a bit of patience. It might seem daunting, but with this guide, you’ll be drilling holes in glass like a pro, avoiding common mistakes and achieving clean results every time.
Must-Have Tools in Your House If You Work Regularly


Ever stared at a beautiful glass project, perhaps a custom shelf, a unique light fixture, or even just needing to hang something on a glass surface, and wondered if drilling into it was even possible? It’s a common thought, and for good reason! Glass can seem fragile, and the idea of applying a drill bit to it can fill anyone with a little apprehension. Will it shatter? Will the bit just skate across the surface? The good news is, with the correct approach, drilling through glass isn’t just possible; it’s a very achievable DIY task. We’re here to walk you through exactly how to do it, step-by-step, so you can confidently tackle your glass drilling projects.
Understanding Glass Drilling: What You Need to Know
Drilling into glass requires a different approach than drilling into wood or metal. The key differences lie in the material’s properties – its hardness, brittleness, and thermal conductivity. Unlike most solid materials, glass doesn’t “give” in the same way. Instead of cutting through, you’re essentially grinding away the material. This process generates heat, which is the primary enemy of a successful glass drilling operation. Overheating can cause the glass to crack or even shatter completely.
The right tools and a steady hand are crucial. It’s not about brute force; it’s about precision and controlled heat management. Think of it like gently but persistently wearing down a surface rather than cutting it. This guide will cover everything from selecting the appropriate drill bits to mastering the drilling technique itself, ensuring you get a clean, precise hole without damaging your glass piece.
Can You Drill Through Glass? The Definitive Answer
Let’s get straight to the point: Yes, you can drill through glass. However, it’s not as simple as grabbing your standard wood or metal drill bits and going to town. Glass requires specialized drill bits and a specific set of techniques to prevent it from breaking. The success of drilling glass hinges on managing heat and applying consistent, light pressure.
When people ask “can you drill through glass?”, they’re often worried about the outcome. The fear of shattering their workpiece is real. But with the right equipment, like diamond-tipped or carbide-tipped bits, and a slow, steady process with plenty of cooling, you can achieve excellent results. It’s a process that rewards patience and careful preparation.
Essential Tools for Drilling Glass
Before you even think about picking up a drill, you need to ensure you have the right tools. Using the wrong bit is the fastest way to disaster. Here’s what you’ll need:
- Specialized Drill Bits: This is non-negotiable. Standard bits won’t work.
- Drill: A variable-speed drill is ideal.
- Coolant/Lubricant: Essential for managing heat.
- Safety Gear: Safety glasses are a must, and gloves are recommended.
- Marking Tool: Something to mark your drilling spot.
- Clamping System: To keep the glass stable.
- Water Source: For continuous cooling.
Drill Bits for Glass: What Works?

The type of drill bit you use is paramount. Standard twist drill bits designed for metal or wood will not cut glass. They will either skate across the surface or, more likely, cause the glass to crack due to excessive heat and friction.
Diamond-Tipped Drill Bits
These are the most common and effective bits for drilling glass. They feature a tip coated with industrial diamonds, which are incredibly hard and abrasive. They work by grinding away the glass material rather than cutting it.
- Pros: Highly effective, can drill through various types of glass, durable.
- Cons: Can be more expensive than other options, require careful handling.
Carbide-Tipped Drill Bits (Masonry Bits with a Spear Tip)
While not as ideal as diamond bits, specialized carbide-tipped bits, often referred to as “masonry bits with a spear tip” or “glass and tile bits,” can work for thinner, softer glass. These bits have a hardened carbide tip designed for drilling hard materials. They are generally less expensive than diamond bits.
- Pros: More affordable, readily available.
- Cons: May not be suitable for thicker or tempered glass, can wear out faster, generate more heat.
Important Note: For tempered glass (like car side windows or shower doors), drilling is generally not recommended as it’s designed to shatter into small, relatively harmless pieces if compromised. If you need a hole in tempered glass, it must be done at the factory before tempering. For other types of glass, always opt for diamond-tipped bits for the best results.
The Drill Machine
You don’t need a heavy-duty industrial drill press, but a few features will make your job easier:
- Variable Speed: This is crucial. You need to drill at slow speeds to control heat and prevent chipping. A drill with a speed setting of around 200-500 RPM is ideal.
- Corded vs. Cordless: A corded drill often offers more consistent power and torque at lower speeds, which can be beneficial for glass drilling. However, a good quality cordless drill with variable speed control can also work.
Cooling and Lubrication: The Unsung Heroes
Heat is your enemy. Without proper cooling, the friction generated by the drill bit will quickly overheat the glass, leading to cracks. Lubricants not only cool but also help flush away glass dust, reducing friction and prolonging the life of your drill bit.
- Water: The most common and effective coolant.
- Cutting Oil/Lubricant: Specialized cutting oils can offer even better lubrication and cooling.
- Petroleum Jelly or Paste: Can be used to create a dam to hold water around the drilling area.
Safety First!
Glass shards can be sharp and dangerous. Always wear:
- Safety Glasses: To protect your eyes from flying debris.
- Gloves: Heavy-duty work gloves can protect your hands.
- Long Sleeves and Pants: To minimize skin exposure.
Step-by-Step Guide: How to Drill Through Glass
Now that you have your tools and understand the principles, let’s get to the actual drilling. This process requires patience and a gentle touch. Rushing will almost certainly lead to a broken piece of glass.
1. Preparation is Key
Clean the Glass: Ensure the surface where you’ll be drilling is clean and free of dust or debris. This prevents grit from interfering with the drilling process.
Mark Your Spot: Use a marker or a grease pencil to mark the exact spot where you want to drill. For precision, especially on the second side of a hole, you might use a piece of tape over the mark.
Create a Water Reservoir (Optional but Recommended): For vertical drilling, you can create a small dam around the drilling area using plumber’s putty or petroleum jelly. Fill this dam with water to keep the bit and glass cool. For horizontal drilling, you’ll need a way to continuously apply water.
2. Securing the Glass
Glass needs to be stable. It shouldn’t move or vibrate during drilling. This is critical for preventing cracks.
- On a Flat Surface: Place the glass on a stable, flat surface, like a workbench or a piece of plywood. You can use clamps (with protective padding like felt or thick cloth between the clamp and glass) to hold it in place. Avoid overtightening, which can stress the glass.
- Drilling an Object: If you’re drilling a glass object like a vase or bottle, ensure it’s firmly supported. Sometimes, filling it partially with sand can provide internal stability.
3. Setting Up Your Drill
Attach the Bit: Securely insert the diamond-tipped or carbide-tipped drill bit into your drill chuck.
Set the Speed: Adjust your drill to its lowest speed setting. A slow, consistent rotation is vital. If your drill doesn’t have variable speed, you’ll need to be extremely careful with your trigger control.
Drilling Angle: For most applications, you’ll want to drill perpendicular to the glass surface. Start at a slight angle (around 45 degrees) to create a starting groove, then gradually bring the drill bit to a 90-degree angle. This prevents the bit from wandering and chipping the glass.
4. The Drilling Process
Start Slow: Begin drilling at the marked spot. Apply very light, consistent pressure. Let the drill bit do the work; don’t force it.
Cooling is Crucial: Ensure the bit and the drilling area are continuously cooled. If you’ve made a water reservoir, keep it topped up. If not, you’ll need to periodically stop drilling, lift the bit out, and apply more water or coolant. You might also see specialized glass drilling rigs that supply a constant stream of water. A simple method is to have a spray bottle of water handy to mist the area regularly.
Manage Heat: If the glass feels hot to the touch (use caution!), or if you see steam rising, stop immediately. Let it cool down completely before continuing. Overheating is the most common cause of glass breakage.
Listen to the Drill: A smooth drilling sound is good. A squealing or grinding sound often indicates too much pressure or insufficient cooling.
Patience, Patience, Patience: Drilling glass takes time. A 1/4-inch hole might take several minutes. Resist the urge to speed up the process.
5. Finishing the Hole
Approaching the Other Side: As you get close to breaking through to the other side, reduce pressure even further. If you’re drilling through a piece of glass and the bit is about to exit, you can:
- Flip the glass over and drill from the other side, meeting the existing hole. This is often the best method for a cleaner exit.
- Apply extremely light pressure.
- Consider using a piece of masking tape or painter’s tape on the exit side to help reduce chipping.
Clean Up: Once the hole is complete, carefully remove the drill bit. Rinse the glass thoroughly with water to remove all glass dust and any remaining coolant or lubricant. Inspect the hole for any sharp edges or chips.
6. Smoothing the Edges (Optional)
Sometimes, the edges of the drilled hole can be a bit sharp or have minor imperfections. You can smooth them using:
- Fine-grit Wet/Dry Sandpaper: Use it with water to gently sand the edges.
- Diamond Sanding Pads: These are specifically designed for smoothing glass and other hard materials.
Always wear safety glasses and gloves when smoothing edges.
Troubleshooting Common Glass Drilling Issues
Even with careful preparation, things can go wrong. Here are some common issues and how to address them:
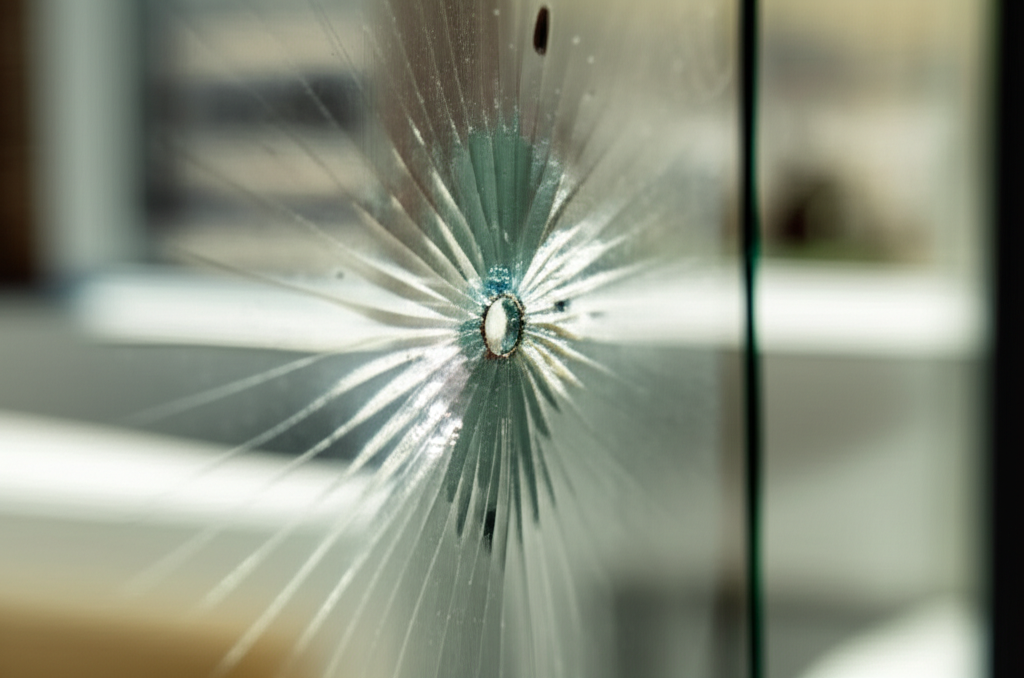
- Cracking: Usually caused by excessive pressure, insufficient cooling, or starting the drill at too steep an angle. If you notice a hairline crack starting, stop immediately. Sometimes, a small crack can be managed if it’s not in a critical area, but often, the piece is compromised.
- Chipping: Often occurs at the entry or exit point. Using tape on the exit side, starting at an angle, and reducing pressure as you break through can help minimize chipping.
- Drill Bit Slipping: Ensure the glass is stable and the drill bit is centered on your mark. A small starting groove made at an angle can help the bit grip.
- Overheating: This is a constant risk. If you’re not using enough coolant or drilling too fast, the glass will heat up. Always prioritize cooling.
Comparing Drill Types for Glass Projects
When tackling glass, the tool choice is critical. While you might be tempted to use what you have, specialized tools make the job significantly easier and safer. Here’s a quick look at common drills and their suitability for glass:
| Drill Type | Suitability for Glass | Key Considerations |
|---|---|---|
| Standard Corded Drill | Moderate to Good | Must have variable speed control. Offers consistent power. |
| Cordless Drill (with Variable Speed) | Good | Convenient, but battery life and consistent low-speed torque can be a factor. Ensure it has sufficient power. |
| Hammer Drill | Never Use | The hammering action will shatter glass. Designed for masonry. |
| Rotary Tool (e.g., Dremel) | Limited (for very small holes/engraving) | Requires specialized diamond bits. Difficult to maintain consistent speed and pressure for larger holes. Best for delicate work or small etching. |
| Drill Press | Excellent | Provides stability and precise control over speed and pressure. Ideal for repeated or critical drilling. Requires a way to implement cooling. |
For most DIY projects, a variable-speed corded or cordless drill is perfectly adequate, provided you use the correct bits and techniques. A drill press offers superior control but is a larger investment.
When NOT to Drill Glass
While this guide focuses on how to drill glass, it’s equally important to know when not to attempt it. As mentioned earlier:
- Tempered Glass: This type of glass is heat-treated to be much stronger and safer when broken. However, this process makes it extremely susceptible to shattering if drilled or cut after tempering. Any holes or modifications must be done before the tempering process.
- Glass Under Stress: If a glass item has existing cracks, chips, or is under significant stress (e.g., a window pane that has warped slightly), drilling near these areas is highly likely to cause catastrophic failure.
- Very Thin or Fragile Glass: While possible, drilling extremely thin glass (like decorative glass ornaments or very thin vials) requires exceptional care, specialized micro-drilling bits, and is often best left to professionals or avoided altogether if the risk of breakage is too high.
Always assess the condition and type of glass before you begin. If in doubt, it’s better to err on the side of caution.
Frequently Asked Questions About Drilling Glass
What is the best drill bit for glass?
The best drill bit for glass is a diamond-tipped drill bit. These bits are specifically designed to grind through hard materials like glass, ceramic, and tile without causing excessive heat or chipping when used correctly.
Can I use a regular drill bit on glass?
No, you cannot use regular drill bits (like those for wood or metal) on glass. They are not hard enough, will likely not penetrate the glass, and will instead skate across the surface, potentially causing it to crack from the friction and heat generated.
How do I stop glass from cracking when drilling?
To prevent glass from cracking, use a diamond-tipped drill bit, drill at a slow speed, apply light and consistent pressure, and ensure the drilling area is kept cool with a lubricant like water. Avoiding sudden movements and securing the glass properly are also crucial.
Do I need a special drill for glass?
You don’t necessarily need a “special” drill, but you do need a drill that offers variable speed control, allowing you to drill at very slow RPMs (around 200-500). A standard corded or cordless drill with this feature will work well, especially when paired with the correct drill bits and techniques.
Can you drill tempered glass?
It is generally not recommended to drill tempered glass after it has been tempered. The tempering process makes it very strong, but also very brittle. If you attempt to drill tempered glass, it will likely shatter into thousands of small pieces. Any necessary holes must be made before the glass is tempered.
What is the best coolant for drilling glass?
Water is the most common and effective coolant for drilling glass. You can also use specialized cutting oils or a mixture of water and a few drops of dish soap to improve lubrication and cooling. The key is to keep the drill bit and the glass from overheating.
How long does it take to drill a hole in glass?
The time it takes to drill a hole in glass can vary significantly depending on the thickness of the glass, the diameter of the hole, and the type of drill bit used. However, it’s a slow process. A common estimate is anywhere from 5 to 30 minutes or even longer for a single hole, emphasizing the need