Yes, you absolutely can drill through cast iron with the right tools, techniques, and a bit of patience! This guide will walk you through the process, ensuring a successful and safe drilling experience, even for beginners.
Must-Have Tools in Your House If You Work Regularly


Ever faced a stubborn cast iron component, perhaps a vintage engine block or a heavy-duty bracket, and wondered if drilling a hole through it was even possible? You’re not alone! Cast iron, known for its strength and durability, can seem intimidating to work with, especially if you’re new to metalworking. The fear of breaking drill bits, damaging your workpiece, or creating an unsafe situation is real. But don’t let its toughness deter you. With the correct approach, drilling cast iron is entirely achievable, and this article is here to demystify the process for you. We’ll cover everything from selecting the right drill bits to mastering the drilling technique, ensuring you can tackle your cast iron projects with confidence.
Understanding Cast Iron
Before we dive into the “how,” it’s helpful to understand what cast iron is and why it presents unique challenges when drilling.
Cast iron isn’t just one material; it’s a family of iron-carbon alloys with a carbon content typically ranging from 2% to 4%. This high carbon content is what gives it its distinctive properties:
- Strength: It can withstand significant compressive forces.
- Brittleness: Unlike steel, which can bend, cast iron is more prone to fracturing under sudden shock or excessive stress. This is a key consideration when drilling.
- Hardness: Depending on the specific type of cast iron, it can be quite hard, requiring specialized drill bits.
- Machinability: While it can be machined, its machinability varies greatly. Gray cast iron, for instance, is generally easier to machine than ductile iron or white cast iron.
The presence of graphite flakes or nodules within the iron matrix also affects how it behaves when drilled. These inclusions can act as lubricants, aiding in chip removal, but they can also cause the material to chip or break if not handled carefully.
Can You Drill Through Cast Iron? The Short Answer
Yes, you absolutely can drill through cast iron. However, it requires specific tools and techniques to do it safely and effectively. Rushing the process or using the wrong equipment can lead to broken drill bits, damaged workpieces, or even personal injury. Think of it less as brute force and more as a precise, controlled operation.
Essential Tools for Drilling Cast Iron
The right tools are crucial for a successful cast iron drilling project. Using standard bits on cast iron is a recipe for frustration and broken bits.
1. The Right Drill Bits
This is arguably the most critical component. You need drill bits designed for hard metals.
- High-Speed Steel (HSS) Cobalt Bits: These are the go-to for drilling cast iron. The cobalt alloyed into the HSS makes the bits significantly harder and more heat-resistant, which is essential for drilling tough materials like cast iron. Look for bits labeled “Cobalt” or “HSS-Co.”
- Carbide-Tipped Masonry Bits (Use with Caution): While primarily for masonry, some high-quality carbide-tipped bits can handle cast iron in a pinch, especially for smaller holes. However, they are more brittle than cobalt bits and can chip if subjected to side-loads or impact. They are generally not recommended for frequent or heavy-duty cast iron drilling.
- Brad-Point or Split-Point Bits: For better accuracy and to prevent “walking” (the bit drifting from your intended starting point), brad-point or split-point bits are advantageous. Split-point bits are self-centering, meaning you don’t necessarily need a center punch for accurate starting.
2. A Powerful and Versatile Drill
You’ll need a drill that can provide sufficient power and controlled speed. The type of drill you use can impact your success.
- Corded Electric Drill: These generally offer more consistent power and torque than cordless models, making them a reliable choice for drilling through tough materials. A variable speed drill is highly recommended.
- Drill Press: For precision and consistent pressure, a drill press is ideal. It allows for stable mounting of the workpiece and precise control over the drilling depth and angle. This is the preferred tool for critical applications or frequent cast iron drilling.
- Magnetic Drill: For larger, heavier cast iron pieces where portability is needed, a magnetic drill (mag drill) is an excellent option. It uses a magnetic base to secure itself to the workpiece, providing stability for powerful drilling.
3. Lubricant/Cutting Fluid
Drilling metal generates heat, which can quickly dull and break drill bits. A cutting fluid or lubricant is essential to keep the bit cool and aid in chip removal.
- Cutting Oil: Specifically designed for metalworking, cutting oils help reduce friction and heat.
- Multi-Purpose Lubricant: Products like WD-40 or specific tapping fluids can also work, though dedicated cutting oils are generally more effective for cast iron.
- DIY Options: Some people use a mixture of motor oil and kerosene (use with caution due to flammability) or even just motor oil in a pinch, but dedicated cutting fluids are best.
4. Other Essential Accessories
- Center Punch: To create a small indentation for the drill bit to start in, preventing it from wandering.
- Hammer: To strike the center punch.
- Safety Glasses/Face Shield: Non-negotiable. Metal shavings, especially from brittle cast iron, can fly at high speeds.
- Gloves: To protect your hands from sharp edges and hot metal.
- Clamps or Vise: To securely hold the cast iron workpiece. Never try to hold it with your hands.
- Wire Brush: For cleaning away debris and coolant.
- Shop Vacuum: For cleaning up metal chips.
Step-by-Step Guide to Drilling Cast Iron
Now that you have your tools, let’s get to the process. Remember, patience and a methodical approach are key.
Step 1: Prepare Your Workspace and Workpiece
Ensure you have a stable, well-lit workspace. Securely clamp the cast iron piece in a vise or to a workbench. Make sure the area you intend to drill is clean and free of rust, paint, or grease. This will help the drill bit start cleanly and prevent contamination of your cutting fluid.
Step 2: Mark Your Drilling Spot
Use a marker or scribe to clearly mark the exact center where you want to drill. Accuracy here will save you headaches later.
Step 3: Center Punch the Mark
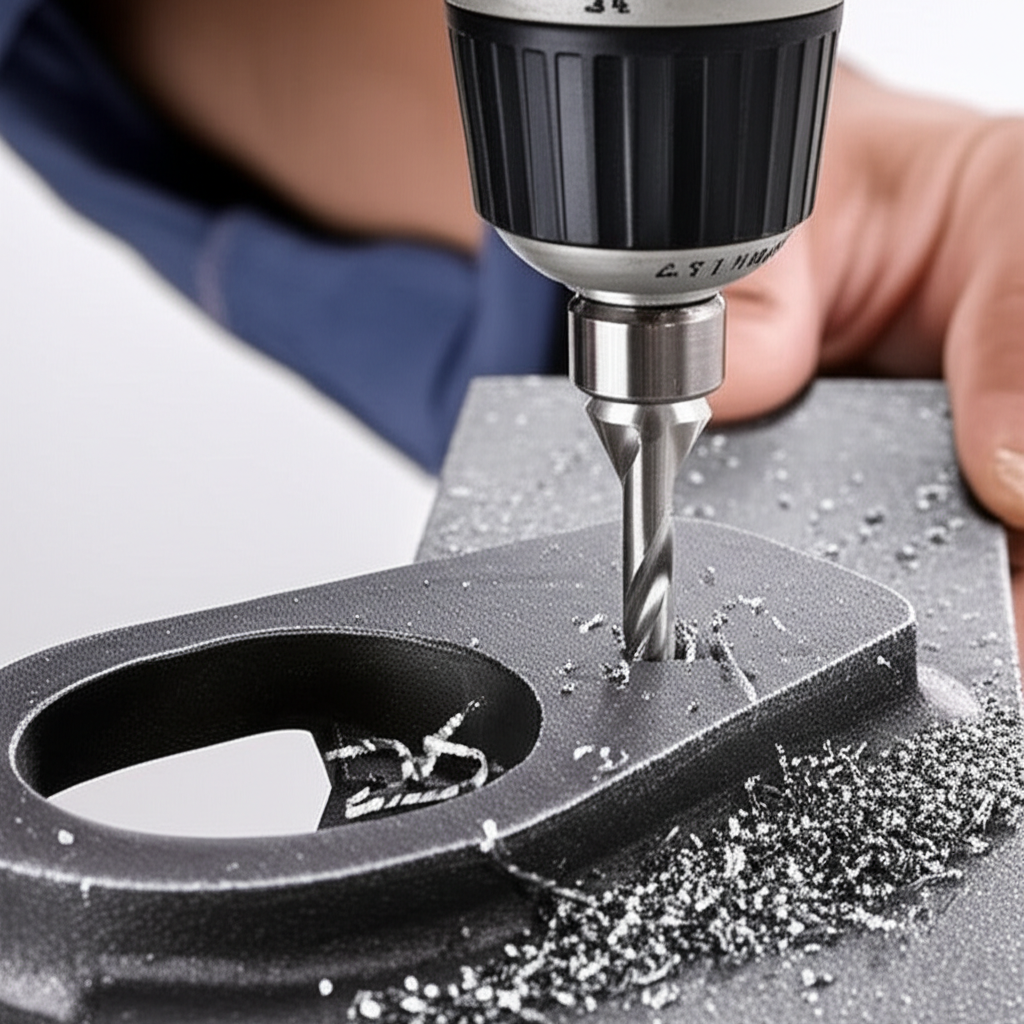
Place the point of your center punch directly on the marked spot. Give it a firm, sharp tap with a hammer. The goal is to create a small indentation, about 1/16 to 1/8 inch deep. This indentation will guide the tip of your drill bit and prevent it from “walking” across the surface when you start drilling.
Step 4: Select the Right Drill Bit and Speed
Choose a sharp, high-quality cobalt drill bit. For cast iron, you generally want to use a slower speed than you would for softer metals like aluminum or mild steel. This slower speed reduces heat buildup and provides better control.
A general guideline for speeds:
| Drill Bit Diameter | Recommended Speed (RPM) |
|---|---|
| 1/8″ – 1/4″ | 500 – 800 |
| 1/4″ – 1/2″ | 200 – 500 |
| 1/2″ – 1″ | 100 – 200 |
Note: These are approximate values. Always refer to drill bit manufacturer recommendations if available. A drill press with a variable speed control is invaluable here. If using a handheld drill, start slow and adjust as needed.
Step 5: Apply Lubricant
Apply a generous amount of cutting fluid or your chosen lubricant to the center punch mark and the drill bit tip. You’ll want to reapply this periodically throughout the drilling process.
Step 6: Start Drilling
If using a drill press, align the drill bit precisely with the center punch mark. Lower the quill slowly until the bit engages the indentation. If using a handheld drill, hold it perpendicular to the surface and apply steady, even pressure.
Begin drilling at the slow speed you selected. Apply consistent, moderate pressure. Don’t force the drill bit. Let the bit do the work. You should see small, curly chips being produced.
Step 7: Clear Chips and Reapply Lubricant
Periodically, lift the drill bit slightly out of the hole (while still spinning slowly) to clear the chips and allow fresh lubricant to reach the cutting edge. This is crucial to prevent the hole from clogging and the bit from overheating. You should see a steady stream of chips, not a dusty powder.
If you see smoke or the bit starts to bind, stop immediately. Lift the bit, reapply lubricant, and continue at a slightly slower speed if necessary. For deeper holes, you may need to retract the bit more frequently.
Step 8: Maintain Consistent Pressure and Angle
Throughout the drilling process, maintain steady pressure and ensure the drill remains perpendicular to the workpiece. Avoid rocking or tilting the drill, as this can break the bit or enlarge the hole unevenly.
Step 9: Breaking Through
As you approach the point where the drill bit is about to break through the other side of the cast iron, reduce the pressure significantly. This will prevent the drill bit from “grabbing” the material and potentially damaging the workpiece or the bit as it exits. Let the bit gently cut through the remaining material.
Step 10: Finishing Up
Once the hole is drilled, slowly withdraw the drill bit while it’s still spinning. Use a wire brush to clean the hole and the surrounding area. You can also use a deburring tool to smooth any rough edges around the hole.
Common Problems and How to Solve Them
Even with the best preparation, you might encounter issues. Here are some common problems and their solutions:
- Drill Bit Wandering: Ensure you’ve made a good center punch mark. If it continues, try drilling a small pilot hole (1/8″ or so) first, then use a larger bit.
- Overheating/Smoke: You’re likely drilling too fast, applying too much pressure, or not using enough lubricant. Slow down, ease up on pressure, and reapply lubricant more frequently.
- Broken Drill Bit: This usually happens from drilling too fast, applying excessive pressure, or the bit binding. If the bit breaks off inside the hole, it can be extremely difficult to remove. Sometimes, if the break is clean, you might be able to use pliers or a small punch to back it out. However, often it means the workpiece is compromised. Prevention is key!
- Dull Drill Bit: If the bit isn’t cutting effectively, is producing a powder instead of chips, or requires excessive force, it’s likely dull. Cobalt bits can be sharpened, but it requires a specialized grinding jig for accuracy. For most DIYers, it’s often more economical and effective to simply replace a dull cobalt bit.
Comparing Drill Types for Cast Iron
While most drills can technically drill metal, some are far better suited for the task of drilling cast iron. Here’s a quick comparison:
| Drill Type | Pros for Cast Iron | Cons for Cast Iron | Best For |
|---|---|---|---|
| Cordless Drill | Portable, convenient for small jobs. Variable speed models offer some control. | May lack consistent power/torque for larger holes or harder cast iron. Battery life can be a concern. | Light-duty, occasional drilling of smaller holes. |
| Corded Drill | Consistent power and torque. Generally more durable than cordless. Variable speed is common. | Less portable than cordless drills. Cord can be cumbersome. | Medium-duty drilling, a good all-around choice for DIYers. |
| Drill Press | Excellent precision, control, and stability. Consistent speed and depth. | Not portable. Requires workholding solutions (vise, clamps). | Precision work, repetitive drilling, larger holes, harder cast iron. Ideal for consistent results. |
| Magnetic Drill | Extremely stable on ferrous metals, powerful, portable for large items. | Expensive. Requires a flat, magnetic surface. | Large industrial components, machinery repair, on-site work. |
Alternatives and Advanced Techniques
While drilling is common, other methods exist for creating holes in cast iron:
- Grinding: For rougher holes or when precision isn’t paramount, a grinding wheel on an angle grinder can be used, but it’s less controlled and can generate a lot of heat and dust.
- Plasma Cutting/Oxy-Acetylene Cutting: These are industrial methods for cutting shapes and holes, but they are not suitable for precise drilling and require specialized equipment and training.
- Waterjet Cutting: A highly precise industrial method that uses a high-pressure stream of water mixed with an abrasive material to cut through almost anything, including cast iron, with minimal heat.
For most DIY applications, drilling with cobalt bits remains the most accessible and effective method.
Safety First!
Working with power tools and metal always carries risks. Prioritize safety:
- Eye Protection: Always wear safety glasses or a face shield. Metal chips are sharp and can cause serious eye injury.
- Hand Protection: Wear sturdy gloves to protect against sharp edges and hot metal.
- Secure Workpiece: Never attempt to hold the cast iron piece with your hands while drilling. Use clamps or a vise.
- Proper Ventilation: Ensure good airflow, especially if using lubricants that produce fumes.
- Tool Condition: Use sharp, well-maintained drill bits and power tools.
- Awareness: Be aware of your surroundings and keep flammable materials away from the drilling area, especially if using oil-based lubricants.
For more on general workshop safety, the Occupational Safety and Health Administration (OSHA) offers extensive resources on power tool safety and personal protective equipment.
Frequently Asked Questions (FAQ)
Frequently Asked Questions
What is the best drill bit for cast iron?
The best drill bits for cast iron are High-Speed Steel (HSS) Cobalt bits. The cobalt alloy makes them harder and more heat-resistant, which is essential for drilling tough materials like cast iron without dulling or breaking quickly.
Can I use a regular drill bit on cast iron?
While it might be possible for very small holes in softer grades of cast iron, it’s not recommended. Regular HSS bits will likely dull very quickly, overheat, and may break. Cobalt bits are specifically designed for harder metals and will give you much better results and longevity.
How slow should I drill cast iron?
You should drill cast iron at a slower speed than you would for softer metals like aluminum or mild steel. A general guideline is between 200-800 RPM, depending on the drill bit diameter. Slower speeds reduce heat buildup and give you better control.
Do I need cutting fluid for drilling cast iron?
Yes, using a cutting fluid or lubricant is highly recommended. It reduces friction and heat, which helps to keep your drill bit cool, prolong its life, and allow it to cut more efficiently. It also helps clear away chips.
What happens if I drill too fast through cast iron?
Drilling too fast through cast iron generates excessive heat. This can quickly dull or even melt the cutting edge of your drill bit, leading to premature failure. It also increases the risk of the bit binding and breaking, or damaging your workpiece.
How do I prevent the drill bit from walking on cast iron?
The best way to prevent drill bit wandering is to use a center punch to create a small indentation at your marked drilling spot. This gives the tip of the drill bit a secure place to start. Split-point drill bits also help with self-centering.