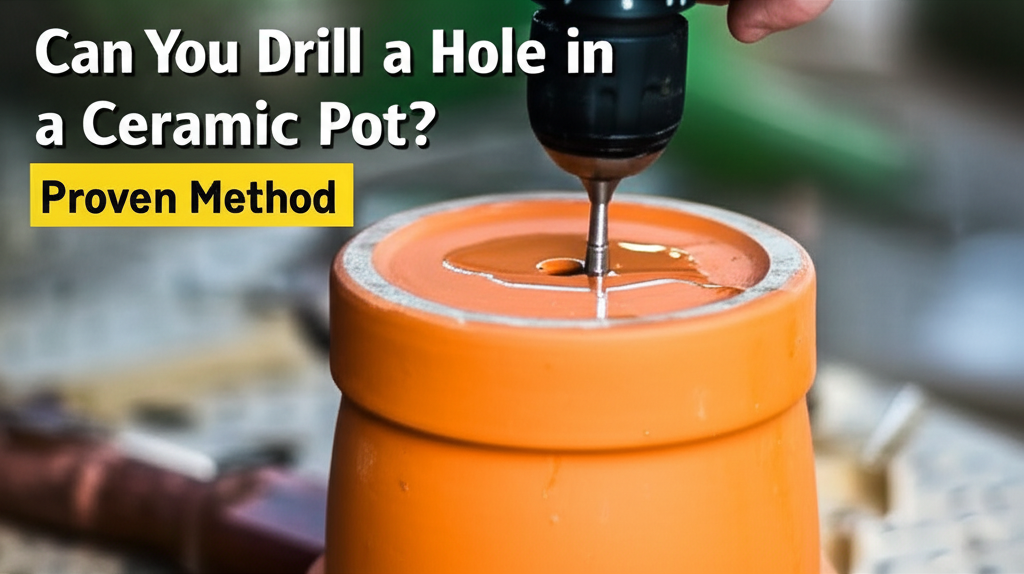
Yes, you absolutely can drill a hole in a ceramic pot! With the right tools and a careful approach, you can easily add drainage to your favorite planters, opening up a world of creative possibilities for your gardening and home decor projects.
Must-Have Tools in Your House If You Work Regularly


Transforming Your Ceramic Pots with Drainage
Ever found yourself admiring a beautiful ceramic pot, only to realize it lacks a crucial drainage hole? It’s a common dilemma for plant lovers and DIY decorators alike. Many stunning ceramic pots, especially decorative ones, are sold without drainage, which can lead to waterlogged soil and unhealthy roots for your beloved plants. But don’t let that stop you! Fortunately, with a little know-how and the correct technique, you can safely and effectively drill a drainage hole into almost any ceramic pot. This skill not only saves your plants but also unlocks the potential to repurpose any ceramic vessel into a functional planter. We’ll walk you through a proven, step-by-step method, ensuring you can tackle this project with confidence, even if you’re new to drilling or DIY. Get ready to give your plants the healthy environment they deserve!
Why Drill a Hole in a Ceramic Pot?
Ceramic pots are fantastic for adding a touch of style and elegance to your home or garden. They come in an endless array of colors, textures, and designs, making them a popular choice for plant enthusiasts. However, a significant drawback is that many are manufactured without drainage holes. This isn’t just an aesthetic oversight; it’s a functional one.
Plants need proper drainage to thrive. When water can’t escape, it sits at the bottom of the pot, creating a soggy environment. This can lead to:
- Root Rot: Excess moisture depels oxygen from the soil, suffocating the roots and encouraging fungal diseases like root rot.
- Salt and Mineral Buildup: As water evaporates from the surface, it leaves behind salts and minerals, which can accumulate in the soil and become toxic to plants.
- Stunted Growth: Roots constantly sitting in water can’t absorb nutrients effectively, leading to poor growth and yellowing leaves.
- Pest Infestations: Damp conditions can attract pests like fungus gnats.
By drilling a drainage hole, you ensure excess water can escape, promoting healthy root development and vibrant plant growth. It’s a simple modification that makes a world of difference to your plants’ well-being and longevity. Plus, it allows you to use those beautiful, solid ceramic pots you love as functional planters without worry.
The Proven Method: Step-by-Step Drilling
Drilling into ceramic might sound intimidating, but with the right preparation and technique, it’s a manageable DIY task. The key is to use the correct drill bits and to go slow and steady.
What You’ll Need: Essential Tools and Materials
Before you begin, gather all your supplies. Having everything ready will make the process smoother and safer.
- Cordless Drill or Electric Drill: A variable speed drill is ideal, allowing for precise control.
- Diamond-Tipped Drill Bits (or Carbide-Tipped Masonry Bits): These are crucial for cutting through hard materials like ceramic, porcelain, and tile. Diamond-tipped bits are generally preferred for ceramic as they offer a cleaner cut and last longer. Look for sizes appropriate for your desired drainage hole, typically between 1/4 inch and 1/2 inch.
- Safety Glasses: Absolutely essential to protect your eyes from ceramic dust and shards.
- Work Gloves: To protect your hands and improve grip.
- Mask or Respirator: To avoid inhaling fine ceramic dust, which can be harmful.
- Painter’s Tape or Masking Tape: Helps prevent the drill bit from slipping when you start and can also help reduce chipping.
- Water Source (Spray Bottle or Running Water): Crucial for cooling the drill bit and the ceramic, which prevents overheating and cracking.
- A Stable Work Surface: A sturdy table or workbench.
- A Towel or Drop Cloth: To catch water and debris.
- Optional: A Small Piece of Wood or a Scrap Tile: To place under the pot if drilling near an edge or if the pot is very thin.
Step-by-Step Guide to Drilling Your Ceramic Pot
Follow these steps carefully for a successful drilling experience:
Step 1: Prepare Your Workspace and Pot
- Find a well-ventilated area, preferably outdoors or in a garage, as drilling ceramic creates fine dust.
- Lay down a towel or drop cloth on your work surface to protect it and catch any mess.
- Clean the ceramic pot thoroughly to remove any dirt or debris.
- Place the pot on a stable, non-slip surface. If the bottom of the pot is uneven, you might want to place it inside a larger container or a shallow pan of water to keep it stable and contained.
Step 2: Mark the Drainage Hole Location
- Decide where you want the drainage hole. The center of the bottom is typical, but you can place it slightly off-center if that’s better for your plant’s root ball or for stability.
- Use a pencil or marker to mark the spot.
- Apply a piece of painter’s tape or masking tape over the marked spot. This tape acts as a guide and helps prevent the drill bit from “walking” or skidding across the smooth ceramic surface when you start drilling.
Step 3: Set Up for Drilling and Cooling
- Crucial Cooling: Ceramic generates a lot of heat when drilled, which can cause it to crack. You need a constant cooling method. The easiest way is to have a spray bottle filled with water handy and spray the area around the drill bit frequently. Alternatively, you can place the pot in a shallow tray and keep a steady stream of water running over the drilling area, or submerge the area in water if possible.
- Drill Speed: Set your drill to a low to medium speed. High speeds generate more heat and increase the risk of cracking.
- Drill Bit Angle: Start drilling at a slight angle (around 45 degrees) to create a small notch or groove in the ceramic. This notch will help guide the drill bit and prevent it from wandering.
Step 4: Begin Drilling
- Once the notch is created, slowly bring the drill bit to a perpendicular (90-degree) angle to the pot’s surface.
- Apply steady, gentle pressure. Let the drill bit do the work; forcing it will increase the chance of cracking the ceramic.
- Continue to spray water or ensure water is flowing over the drilling area as you work. You’ll see a slurry of water and ceramic dust forming – this is normal and indicates effective cooling.
- Periodically lift the drill bit slightly while it’s still spinning to clear out debris and allow more water to reach the cutting surface.
Step 5: Completing the Hole and Finishing
- As you get close to breaking through the other side of the ceramic, reduce the pressure even further.
- Once the drill bit has gone all the way through, continue to run water over the hole for a minute or two to cool the area.
- Carefully remove the drill bit.
- Allow the pot to dry completely.
- You can gently smooth any rough edges around the new hole with a piece of sandpaper or a small file if necessary, but be careful not to chip the surrounding ceramic.
Choosing the Right Drill Bit for Ceramic
The type of drill bit you use is paramount. Standard metal or wood drill bits will not work on ceramic and will likely break or simply skate across the surface.
Here’s a quick look at common drill bit types and their suitability for ceramic:
| Drill Bit Type | Suitability for Ceramic | Notes |
|---|---|---|
| Standard High-Speed Steel (HSS) Bits | Poor | Designed for wood, metal, plastic. Will dull quickly and struggle with ceramic. |
| Carbide-Tipped Masonry Bits | Fair to Good | Can drill ceramic with patience and cooling. The carbide tip is harder than steel. |
| Diamond-Tipped Drill Bits | Excellent | The best choice for ceramic, porcelain, glass, and tile. The diamond grit cuts through hard materials effectively. |
When purchasing diamond-tipped bits, ensure they are specifically designed for drilling tile or glass. These bits typically have a hollow core or a specific cutting edge made for these hard surfaces. You can find them at most hardware stores or online retailers specializing in tools.
Tips for Success and Avoiding Common Mistakes
Even with the right tools, a few extra tips can make all the difference in preventing frustration and ensuring a perfect result.
- Patience is Key: Rushing the process is the quickest way to crack your pot. Go slow, apply steady pressure, and let the drill bit do the cutting.
- Start Slow: Always begin with a low drill speed. You can gradually increase it slightly if needed, but never go too fast.
- Maintain Cooling: Don’t underestimate the importance of water. It’s not just for cooling; it also lubricates the bit and helps flush away debris, making the cutting process more efficient.
- Avoid Excessive Pressure: Let the weight of the drill and the sharpness of the bit do the work. Pushing too hard can cause the bit to bind, leading to breakage or cracking of the ceramic.
- Consider Pot Thickness: Thinner-walled pots are more fragile. Be extra cautious and use even gentler pressure with these.
- Drill Bit Stability: If your drill bit wobbles, it’s more likely to chip or crack the ceramic. Ensure your bit is securely fastened in the drill chuck.
- Practice First: If you’re nervous, consider practicing on a broken ceramic tile or an inexpensive ceramic piece before tackling your prized pot.
What About Glazed Ceramic Pots?
Glazed ceramic pots are essentially fired clay coated with a glass-like glaze. The drilling process is the same as for unglazed ceramic, but there are a few extra considerations:
- The glaze can be brittle and prone to chipping, especially around the entry and exit points of the hole.
- The painter’s tape is even more crucial on glazed surfaces to prevent the drill bit from skidding.
- Start at a very slow speed and gentle pressure to score the glaze before attempting to drill through the clay body.
- Be prepared for the possibility of minor chipping, even with careful drilling. If aesthetics are paramount, you might consider placing a decorative element or a small piece of mesh over the drainage hole once complete.
For more in-depth information on drilling various materials, including tile and ceramics, resources like those from the National Institute for Occupational Safety and Health (NIOSH) on silica dust management can provide valuable context on safety precautions. Additionally, manufacturers of tools and materials often have helpful guides; for instance, understanding drill bit materials from reputable sources like Tools Today can further enhance your DIY knowledge.
Frequently Asked Questions (FAQs)
Got more questions about drilling ceramic pots? We’ve got you covered.
Can I use a regular drill bit for ceramic?
No, it is strongly advised against using regular drill bits (like those for wood or metal) for ceramic. They are not hard enough to cut through the material and will likely dull immediately, overheat, or break. You need specialized drill bits, such as diamond-tipped or carbide-tipped masonry bits.
How do I prevent my ceramic pot from cracking while drilling?
The key to preventing cracks is using the correct drill bits, drilling at a slow to medium speed, applying steady and gentle pressure, and most importantly, keeping the drill bit and ceramic cool with water. Starting at an angle to create a notch also helps.
What size drill bit should I use for a ceramic pot?
The size of the drill bit depends on the size of your pot and the desired drainage. A common and effective size for most plant pots is between 1/4 inch (6mm) and 1/2 inch (13mm). For very small pots, a smaller bit might suffice, while larger pots may benefit from slightly larger holes.
Is it safe to drill ceramic pots indoors?
While possible, it’s not ideal. Drilling ceramic creates fine dust, which can be harmful if inhaled and can settle on surfaces. It’s best to drill outdoors, in a garage, or in a well-ventilated area with appropriate respiratory protection (a mask or respirator).
What if I don’t have a diamond-tipped bit? Can I still drill ceramic?
You can try using a carbide-tipped masonry bit, but it will require more patience, slower speeds, and very careful cooling. The process will be more difficult, and the risk of chipping or cracking the ceramic increases. Diamond-tipped bits are highly recommended for the best results and safety.
How much pressure should I apply when drilling ceramic?
You should apply minimal, steady pressure. Think of it as guiding the drill rather than forcing it. Let the drill bit’s sharpness and the drill’s rotation do the cutting. Too much pressure is a primary cause of cracking.
Can I drill holes in terracotta pots too?
Yes, you can drill holes in terracotta pots as well. Terracotta is a softer material than glazed ceramic, making it generally easier to drill. However, the same principles apply: use the correct drill bits (diamond or carbide-tipped), go slow, and use water for cooling to prevent heat-related damage.
Conclusion: Plant Paradise Awaits!
Transforming your favorite ceramic pots into functional, plant-friendly vessels is entirely achievable with the right approach. By equipping yourself with diamond-tipped drill bits, prioritizing safety with glasses and a mask, and employing a steady, water-cooled drilling technique, you can confidently create essential drainage holes. Remember to work slowly, apply gentle pressure, and let the tools do the work. This simple DIY skill will not only save your plants from the perils of overwatering but also allow you to maximize your use of beautiful ceramic pieces in your home and garden. Now go forth and give your plants the perfect home they deserve!