Yes, a regular drill bit can go through metal, but using the right type of bit and technique makes all the difference for safe, clean, and efficient results. Avoid frustration and damaged bits by understanding the basics of drilling metal.
Must-Have Tools in Your House If You Work Regularly


Ever stood in your garage, staring at a piece of metal you need to drill through, and wondered if that standard drill bit lurking in your toolbox is up to the task? It’s a common question, especially for DIYers tackling home repairs, car maintenance, or even creative metalworking projects. The thought of a drill bit snapping, overheating, or creating a jagged mess can be a bit daunting. But don’t worry! With a little know-how, drilling into metal doesn’t have to be a headache. We’re here to walk you through exactly what you need to know to achieve those amazing results you’re aiming for.
Understanding Your Drill Bits and Metal Drilling
So, can a regular drill bit go through metal? The short answer is yes, but with important caveats. When we talk about “regular” drill bits, we often mean those standard bits designed primarily for wood or general-purpose drilling. While they might have the physical ability to penetrate metal, they aren’t optimized for the job. This can lead to a host of problems, from dulling the bit quickly to producing poor-quality holes and even risking damage to your drill or workpiece.
Metal is a much harder and more demanding material than wood. It requires specialized drill bits and techniques to be drilled effectively. Think of it like trying to cut a steak with a butter knife versus a sharp chef’s knife – both can technically cut, but one will do a far superior job with much less effort and mess. The key lies in the material composition of the drill bit and the specific geometry designed to tackle denser materials.
What Makes a Drill Bit Suitable for Metal?
The magic behind drilling metal lies in the drill bit’s construction and design. Not all drill bits are created equal, and understanding their differences is crucial for success.
Materials: The Backbone of Metal Drilling
Drill bits designed for metal are typically made from harder, more durable materials than those intended for wood. This increased hardness allows them to withstand the friction and heat generated when cutting through dense metal.
- High-Speed Steel (HSS): This is the most common and versatile material for metal drill bits. HSS bits offer good hardness and wear resistance, making them suitable for drilling a wide range of metals, including mild steel, aluminum, brass, and copper. They are also relatively affordable and widely available.
- Cobalt (HSS-Co): These bits are an enhanced version of HSS, with cobalt added to the alloy. Cobalt significantly increases the bit’s hardness, heat resistance, and durability. Cobalt bits are ideal for drilling harder metals like stainless steel, cast iron, titanium, and other tough alloys. They will last longer and perform better in these demanding applications, though they come at a higher price point.
- Titanium Nitride (TiN) Coating: While not a material itself, a titanium nitride coating is a common surface treatment applied to HSS or cobalt bits. This gold-colored coating further enhances hardness, reduces friction, and improves wear resistance, allowing the bit to cut through metal more efficiently and extend its lifespan.
- Black Oxide Coating: Another common coating, black oxide provides some corrosion resistance and lubricity, which can help with drilling softer metals. It’s generally less effective than titanium coating for harder materials but offers a good balance of performance and cost for general-purpose metal drilling.
Geometry: The Cutting Edge
Beyond the material, the shape and angle of a drill bit’s cutting edges are meticulously designed for metal. These features help to efficiently remove metal shavings and dissipate heat.
- Point Angle: Standard wood bits often have a sharper point angle (around 90-118 degrees), which is great for biting into wood. Metal bits typically have a more aggressive point angle, commonly 118 degrees for softer metals and 135 degrees for harder metals. This wider angle helps to create a cleaner cut and reduce the risk of the bit “walking” or wandering on the metal surface.
- Web Thickness: The “web” is the central part of the drill bit that supports the cutting edges. Metal drill bits generally have a thicker web than wood bits. This thicker web provides more rigidity and strength, preventing the bit from flexing or breaking under the pressure of drilling hard materials.
- Flute Design: The flutes are the spiral grooves that wrap around the drill bit. For metal drilling, these flutes are designed to efficiently channel away metal chips (swarf) and allow coolant or lubricant to reach the cutting edge. Proper chip evacuation is critical to prevent the bit from overheating and binding.
When Can a “Regular” Wood Bit Be Used (with Caution)?
While not ideal, there might be rare instances where a standard wood bit could technically penetrate very thin, soft metals like thin aluminum sheeting or soft brass. However, this is generally not recommended for several reasons:
- Rapid Dullness: The softer material of a wood bit will dull very quickly when encountering metal, rendering it ineffective for future use on wood or even more metal.
- Overheating: Without the proper geometry and material hardness, the bit will generate excessive heat, leading to overheating and potentially damaging the bit and the metal workpiece.
- Poor Hole Quality: Expect jagged edges, rough surfaces, and an imprecise hole.
- Risk of Breakage: The bit is much more likely to snap under the stress, which can be dangerous.
In essence, while it might be physically possible in very specific, low-demand scenarios, using a wood bit on metal is a recipe for frustration and inefficiency. It’s always best practice to use bits specifically designed for metal.
The Right Tools for the Job: Metal Drill Bit Types
To ensure you can confidently answer “yes, I can drill metal,” you need to equip yourself with the correct drill bits. Fortunately, the market offers a range of options tailored to different metal types and drilling needs.
Common Metal Drill Bit Types to Have in Your Arsenal
Here’s a breakdown of the essential metal drill bits you’ll want to consider:
- HSS General Purpose Bits: These are your workhorses. A good set of HSS drill bits with fractional and metric sizes will cover most common DIY and automotive tasks. They are versatile and cost-effective.
- Cobalt Drill Bits: If you frequently work with stainless steel, hard alloys, or perform heavy-duty drilling, investing in cobalt bits is a wise decision. They offer superior performance and longevity in demanding applications.
- Step Drill Bits: These unique bits have a conical, stepped design, allowing you to drill multiple hole sizes with a single bit. They are excellent for sheet metal, thin plastics, and electrical panels, creating clean, burr-free holes. They also prevent “walking” effectively.
- Twist Drill Bits: This is the most common type of drill bit, characterized by its spiral flutes. They are suitable for most general-purpose drilling in metal.
- Jobber Length Bits: These are the standard length bits found in most sets, offering a good balance of reach and rigidity.
- Screw Extractor Bits: While not for drilling new holes, these are invaluable for removing broken screws. They often have a drill bit on one end and a reverse-threaded extractor on the other.
Choosing the Right Bit for the Metal
The type of metal you’re drilling will dictate the best bit to use:
| Metal Type | Recommended Drill Bit Type | Key Considerations |
|---|---|---|
| Mild Steel, Aluminum, Brass, Copper | HSS (High-Speed Steel) | Standard point angle (118°), good lubrication is helpful. |
| Stainless Steel, Hardened Steel, Cast Iron | Cobalt (HSS-Co) or HSS with Titanium Nitride (TiN) coating | Higher point angle (135°), slower speeds, ample lubrication are crucial. |
| Sheet Metal (thin gauges) | Step Drill Bits or HSS bits | Use low speeds and light pressure. Step bits create clean holes without burrs. |
| Titanium, Hard Alloys | Cobalt (HSS-Co) | Requires specialized cutting fluids, very slow speeds, and steady pressure. |
As you can see, matching the bit to the metal is a critical step. Using a cobalt bit on mild steel won’t hurt, but it’s overkill and more expensive. Conversely, trying to use a standard HSS bit on stainless steel will lead to rapid dulling and poor results.
The Step-by-Step Guide to Drilling Metal Safely and Effectively
Now that you know the right tools, let’s get down to the actual process. Drilling metal requires a slightly different approach than drilling wood. Patience, proper technique, and safety are paramount.
Step 1: Safety First!
Before you even think about turning on your drill, prioritize safety. Metal shavings can be sharp, and rotating tools can be dangerous if not handled with care.
- Eye Protection: Always wear safety glasses or a full face shield. Metal chips can fly off at high speeds.
- Hand Protection: Wear sturdy work gloves to protect your hands from sharp edges and hot metal.
- Clothing: Avoid loose clothing or jewelry that could get caught in the drill.
- Secure Your Workpiece: Use clamps or a vise to firmly secure the metal piece you’re drilling. Never try to hold it by hand.
Step 2: Mark Your Hole
Accurate placement is key. Use a center punch or a scribe to create a small indentation at the exact spot where you want to drill. This indentation will guide the tip of your drill bit and prevent it from “walking” across the metal surface, especially on smooth or curved surfaces.
Step 3: Select the Right Drill Bit and Drill
As discussed, choose a bit made of HSS or Cobalt, appropriately sized for your needs. Ensure your drill is powerful enough for the task. For tougher metals or larger holes, a corded drill might offer more consistent power than a cordless one.
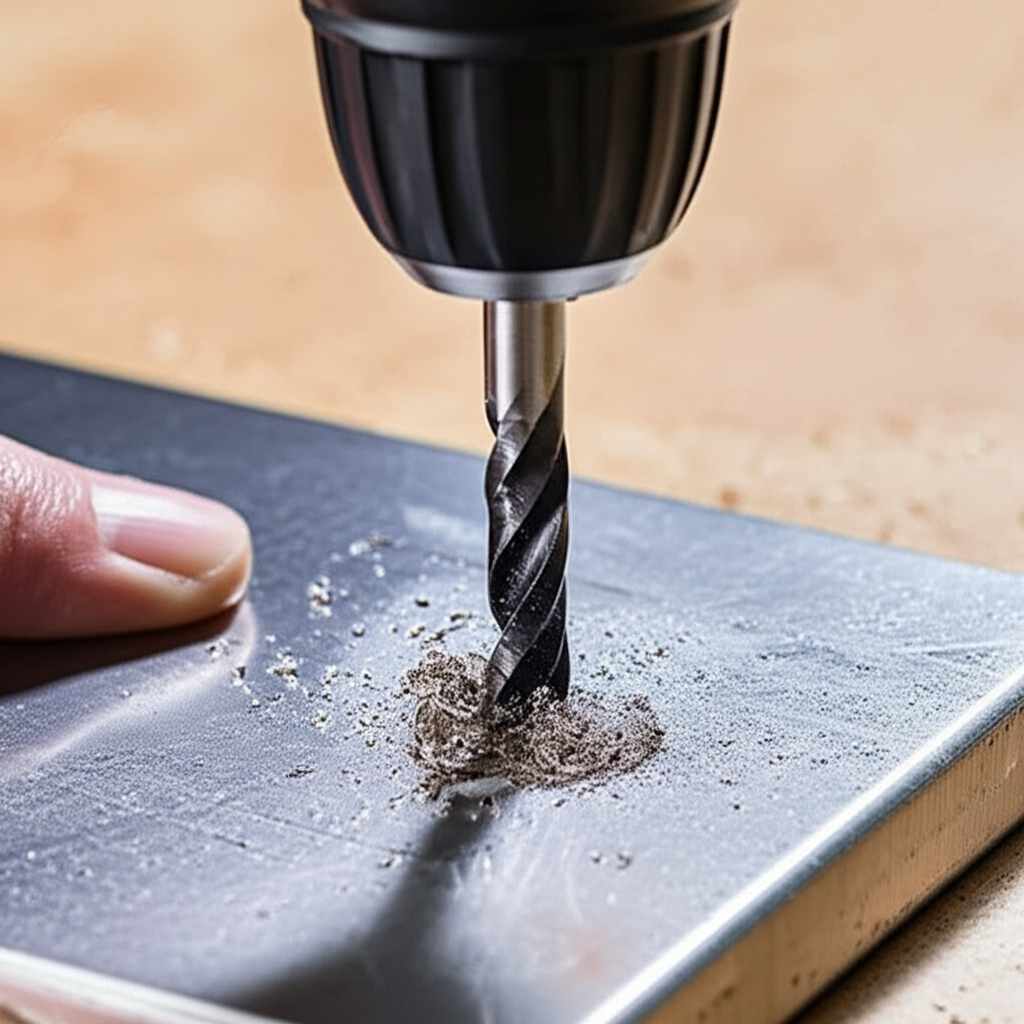
Step 4: Lubrication is Your Friend
This is one of the most crucial steps for drilling metal effectively. Drilling metal generates significant friction and heat. A cutting fluid or lubricant (like cutting oil, WD-40, or even a bit of motor oil) will:
- Cool the drill bit and the workpiece, preventing overheating.
- Reduce friction, allowing the bit to cut more easily.
- Help flush away metal chips from the cutting area.
- Extend the life of your drill bit.
Apply a few drops of lubricant directly to the point where you’ll be drilling before you start, and reapply periodically as you drill.
Step 5: Set Your Drill Speed
Speed is critical when drilling metal. Unlike wood, where you can often use higher speeds, metal requires slower rotational speeds. This slower speed reduces heat buildup and allows the bit to cut more effectively.
- General Rule: The harder the metal and the larger the drill bit diameter, the slower the speed should be.
- For smaller bits (e.g., 1/8 inch): You might use speeds up to 2000-3000 RPM in soft metals, but much lower (e.g., 300-500 RPM) in harder metals.
- For larger bits (e.g., 1/2 inch): Speeds should be significantly lower, perhaps 200-400 RPM in soft metals and even slower for hard alloys.
Many modern drills have variable speed settings. If yours doesn’t, you can often control speed by how hard you squeeze the trigger. Start slowly!
Step 6: Start Drilling
Begin by holding the drill perpendicular to the metal surface. Apply steady, consistent pressure. Start the drill at a slow speed, allowing the bit to create a small pilot hole, guided by your punch mark. Once the bit is seated, you can gradually increase speed slightly if needed, but always maintain control.
Step 7: Maintain Pressure and Clear Chips
Apply firm, downward pressure. Let the drill bit do the cutting; don’t force it. Periodically back the drill bit out of the hole (while still spinning slowly) to clear out the accumulated metal chips (swarf) and reapply lubricant. This is especially important for deeper holes, as it prevents the flutes from becoming clogged.
Step 8: Finish the Hole
As you near the other side of the metal, reduce the pressure slightly. This helps prevent the bit from catching and tearing the metal as it breaks through, which can create a larger, ragged hole and potentially damage the bit or workpiece.
Step 9: Deburr the Hole
Once the hole is drilled, use a deburring tool, a countersink bit, or even a larger drill bit (spun by hand or at very low speed) to remove any sharp edges or burrs around the hole. This makes the hole safer to handle and prepares it for any subsequent steps, like inserting a bolt or screw.
Troubleshooting Common Metal Drilling Issues
Even with the right tools and techniques, you might encounter a few snags. Here’s how to tackle them:
Issue: Drill Bit Wandering or Not Starting Properly
Solution: This is usually due to not using a center punch. Create a dimple with a center punch at your mark before drilling. For very hard metals, you might need to drill a small pilot hole with a very small bit first, then enlarge it with your main bit.
Issue: Drill Bit Overheating or Smoking
Solution: You’re likely drilling too fast or not using enough lubricant. Slow down your drill speed and ensure you’re applying cutting fluid consistently. Back the bit out more frequently to clear chips and allow cooling.
Issue: Drill Bit Breaking
Solution: This often happens when drilling too fast, applying too much pressure, or using a dull bit. Ensure you’re using the correct speed for the metal type, applying steady but not excessive force, and that your bits are sharp. Using a thicker webbed bit designed for metal also helps. Also, avoid twisting the drill sideways.
Issue: Hole is Rough or Jagged
Solution: This can be caused by a dull bit, incorrect speed, or not backing out to clear chips. Try a sharper bit, slower speed, more lubricant, and clearing chips more frequently. Reducing pressure as you break through the other side also helps.
When to Upgrade Your Drill Bits
Even the best drill bits wear out over time. Knowing when to replace them is crucial for maintaining performance and safety.
- Dullness: If you find yourself having to push much harder than before, or if the bit starts to squeal or smoke even with lubrication and proper speed, it’s likely dull.
- Chipped or Broken Cutting Edges: Any visible damage to the cutting edges means the bit won’t cut cleanly or efficiently.
- Excessive Heat: Even with proper lubrication, if the bit gets excessively hot very quickly, it might be dull or damaged.
Investing in good quality HSS or Cobalt drill bits will save you time, frustration, and potentially costly damage in the long run. For perspective on the importance of proper tool maintenance, you can explore resources from organizations like the Occupational Safety and Health Administration (OSHA) regarding safe use of tools, which emphasizes using the right equipment for the job.
Frequently Asked Questions About Drilling Metal
Frequently Asked Questions
Can I use a regular cordless drill to drill metal?
Yes, you can use a cordless drill, but ensure it has sufficient power and torque for the metal you’re drilling. For harder metals or larger holes, a corded drill might offer more consistent power. Always use the appropriate drill bit and slower speeds with a cordless drill to conserve battery and prevent overheating.
What is the best drill bit material for drilling stainless steel?
For stainless steel, you should use Cobalt drill bits (HSS-Co) or High-Speed Steel (HSS) bits with a Titanium Nitride (TiN) coating. These materials are harder and more heat-resistant, essential for tackling stainless steel’s toughness. Always use slow speeds and plenty of cutting fluid.
How do I prevent my drill bit from getting too hot?
The key to preventing overheating is using a combination of factors: slow drill speed, steady and consistent pressure (but don’t force it),